架構說明
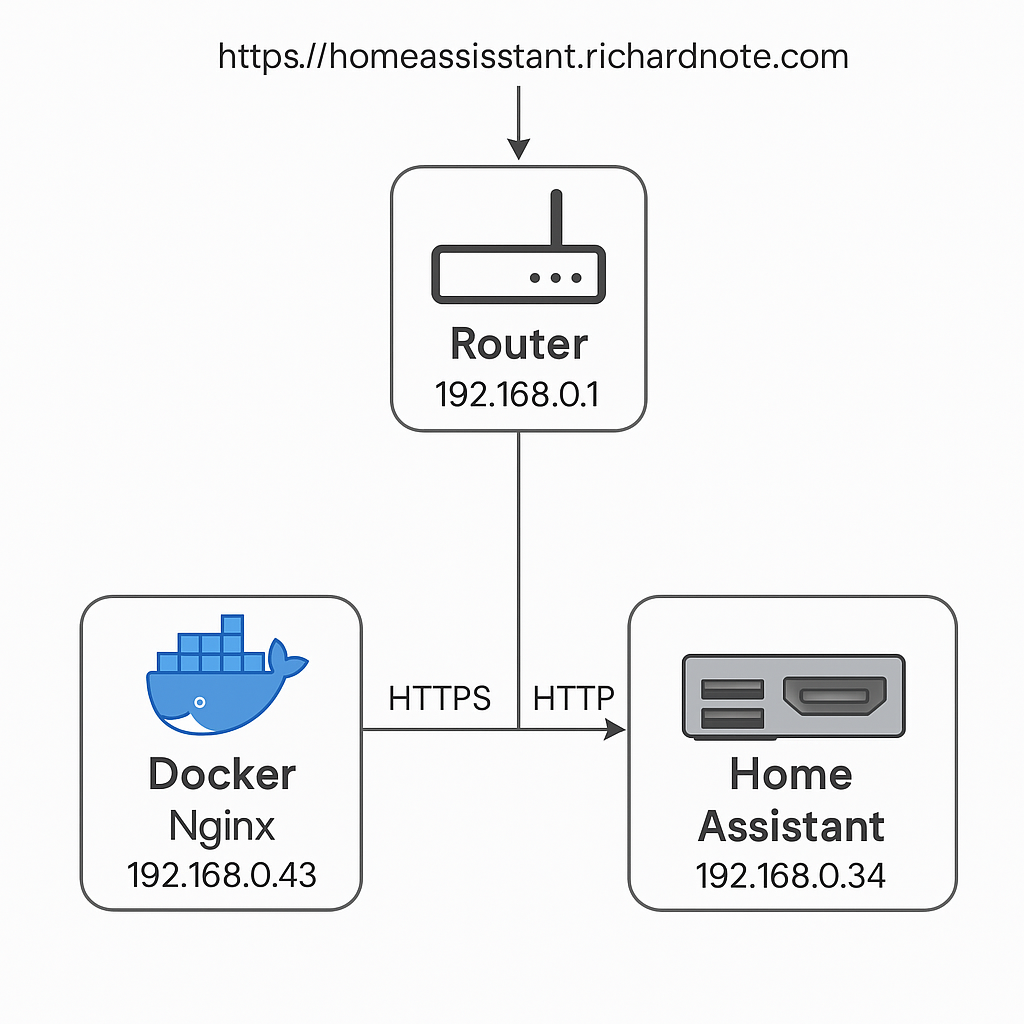
在這個案例中,我們的目標是從外部瀏覽器透過 https://homeassistant.richardnote.com 安全存取 Home Assistant,但 Home Assistant 是跑在另一台實體的 Raspberry Pi(IP:192.168.0.34)上,並沒有 SSL 憑證。
架構如下:
- 路由器(Router)將外部的 443 port 轉發至本地的
192.168.0.43 - 在
.43上有一個 Docker 容器跑著 Nginx Proxy Manager - 該 Nginx 負責反向代理,把請求導到
.34上的 Home Assistant(port:8123)
以下是網路拓樸圖:
services:
  app:
    container_name: 'NginxProxyManager'
    image: 'jc21/nginx-proxy-manager:latest'
    restart: unless-stopped
    ports:
      - '80:80'
      - '81:81'
      - '443:443'
manager/letsencrypt:/etc/letsencrypt
    networks:
      agent-server-network:
        ipv4_address: 172.29.0.4

networks:
  agent-server-network:
    name: "database"
    external: true
NPM 的 Proxy Host 設定
開啟 NPM 後,新增 Proxy Host,設定如下。
Details:
| 欄位 | 設定值 |
|---|---|
| Domain Names | homeassistant.richardnote.com |
| Scheme | http(因為 HA 是 http) |
| Forward Hostname | 192.168.0.34 |
| Forward Port | 8123(HA 預設 port) |
| Websockets | 開啟 |
| Block Exploits | 開啟 |
SSL:
- Request a new SSL Certificate
- Force SSL
- HTTP/2 Support
- HSTS Enabled
- 輸入 Email
- 同意 Let's Encrypt 條款
⚠ 確保你的 router 有開放 80 與 443 port 到 NPM 主機(192.168.0.43)
排查 400 Bad Request
即便設定看起來沒問題,若 Home Assistant 顯示 400 Bad Request,通常表示它不信任這個反向代理伺服器。
可用以下方式處理。
讓 Home Assistant 信任 NPM Proxy
你必須修改 Home Assistant 的 configuration.yaml,加入:
http:
  use_x_forwarded_for: true
  trusted_proxies:
    - 192.168.0.43  # NPM 實體主機 IP
這段代表:
- use_x_forwarded_for:允許使用 Nginx 傳遞來的
X-Forwarded-For取得訪客真實 IP - trusted_proxies:列出允許代理轉送的 IP。
修改後重新啟動 Home Assistant。
驗證結果
設定完成後,Home Assistant 登入畫面應能透過 HTTPS 開啟。